9/16/2013

Zucchini and carrot papardelle


Here comes another zucchini recipe. It just so happens that at the time I'm writing these posts it's zucchini season. On the other hand it gives anyone in zucchini season a chance to  possibly find a new way to use this truly versatile vegetable. Like zucchini and carrot papardelle.


I really like zucchini and I prepare it in many ways. This particular idea is not entirely a gift of my creative intellect. Years ago, when I was just learning Italian, I watched a cooking game show called "La prova del cuoco" and I saw something similar being prepared. Honestly, at the time I didn't understand much and the visual spoke to me more than the audio. I do remember the cook using some white wine and corriander seeds (which didn't really appeal to me). What really inspired me was the way both zucchini and carrot were cut (or sliced off) with a vegetable peeler to resemble papardelle pasta. If you are not familiar with papardelle, it's a thin and really wide type of pasta.


I have really altered the original idea and made it my own. The only original components are the zucchini and carrot and the way it's cut. I also add garlic, leeks, and sometimes mushrooms (if I have some on hand and spare). It's a pretty versatile side dish, but I actually use it as the main dish with grilled salmon. It makes perfect for a light lunch or an evening meal.


Ingredients:

1Tbsp olive oil
2 galic cloves, chopped
2 medium or fairly large zucchinis
2 medium or farily large carrots
1 leek
a bit of water or broth
salt and pepper

Peel and chop the garlic cloves. 

Remove two or three outer layers of the leek. Cut off most of the green part and slice the rest into fairly thin wheels.

Peel the carrots and wash. Slice the carrot with a vegetable peeler as if you were peeling it. Keep rotating it, and try to slice it evenly on both ends. You probably won't be able to slice it all off so you just might have to eat the thin rest.

Wash zucchini and cut the tips off. Cut it with the skin as if you were peeling it with the vegetable peeler. If you keep rotating it you will get a nice green edge on most of the ribbons. Slice off only the flesh and discard the core with seeds.

Put a large frying pan over medium-high heat, heat up the olive oil, add the chopped garlic and fry until golden.

Add carrot strips and leeks and stir for a minute. Add zucchini strips and toss it all to coat and mix. It might be difficult at the beginning but the vegetables will soften and reduce in size.

Reduce heat to medium and continue sauteing for 10-15 minutes until all the vegetables turn soft. Season with salt and pepper.

If the pan gets to dry add a couple of spoons of water or broth. Let almost all the liquid evaporate.

Serve warm. It will serve 4-6 as a side dish and 2-3 as a main dish.


Mushrooms go great with this dish. Just slice a couple and toss with the garlic before you add all the vegetables.

The zucchini and carrot papardelle goes great with most meat and fish. It's really light and delicate in flavour. I absolutely love it with grilled salmon. I have a small electric grill and just season the fish with salt and pepper and grill for about 10 minutes (you might want to brush your grill or the fish with some olive oil). In time you cook the papardelle your fish will be ready. Enjoy!

9/15/2013

Pizza with olives and pizza with salami and mushrooms


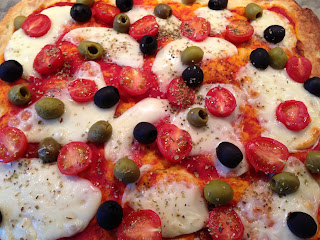
This is really just a follow-up post to my Pizza Quattro Formaggi (http://maciejinthekitchen.blogspot.com/2013/09/pizza-quattro-formaggi.html). I wanted to present a couple of topping options for the same pizza base. As I have mentioned the recipe for the pizza base (as well as the olive and tomato topping given here) come from MypersonaltrainerTv channel on YouTube. Go ahead and give them a try!


The base gives you a nice thin crust that is very versatile and can be used with the toppings of your choice. 


Ingredients:

For the base:

170g/6oz boiled potatoes
300g/10oz and 1Tbsp all purpose flour
100ml/3.5oz warm water
40ml/1.5oz milk (room temperature)
22g/about 1Tbsp fresh yeast
5g/1tsp sugar
5g/tsp fine salt
2Tbsp olive oil

For the top:


Pizza with olives:

150g/5.5oz tomato passata (plain, without spices)
150g/5.5oz mozzarella cheese (from the block not a bag with liquid)
50g/2oz black olives
50g/2oz green olives
100g/3.5oz cherry tomatoes cut in half
oregano


Pizza with salami and mushrooms:

150g/5.5oz tomato passata (plain, without spices)
150g/5.5oz mozzarella cheese (from the block not a bag with liquid)
sliced Italian salami
a couple of button mashrooms cut into slices
oregano


Directions for both types are exactly the same. 


Start with potatoes. Put some water in a small pot and start boiling. In the meantime peel the potatoes (you want 170g peeled, not 170g with the peel on). Cut them in thick slices and put in boiling water. Cook for 10 minutes and drain. Mash them well.While the potatoes are cooling a bit prepare the rest of the ingredients.

Put yeast and sugar in warm water and mix to disolve. 

Put flour in a large bowl, make a small hole in the middle and pour in the yeast mixture, milk, and 1Tbsp olive oil. Mix it a bit with a knife. 

Add warm mashed potatoes, salt and mix with a knife at first and then with your hands. You want to work the dough quickly. It should only take you about 3 minutes, just enough time for all the ingredients to incorporate well. If you knead it too long you will have to keep adding more flour and then the dough will loose it's fluff. 

Cover a large baking sheet (the one that comes with your oven) with baking parchment. Drizzle it with the remaining Tbsp of olive oil. 

Transfer the dough to the baking sheet and push it down in the olive oil. Turn it around once so it's oiled on both sides and start pushing and stretching the dough with your hands from the center to the edges. It will take you just a couple of minutes. Don't worry if the dough doesn't come up exactly to the edges of the baking sheet.

Place the baking sheet in a warm place for 1 hour. You want the temperature to be around 30C (about 85F). The best place in my house for that turned out to be a cupboard with a water heater in my bathroom.

After half an hour you can turn on your oven. Heat up the oven to 250C/480F.


Once the 1 hour is up spread the passata gently over the base and put in the oven for 10 minutes. It's just enough time to prepare the toppings.

Take the base out of the oven, put mozzarella on top and then your selection of toppings. Sprinkle with oregano and put back in the oven for 5 more minutes. Done!


I know that it might seem like not much is being put on the pizza, but trust me, you don't need to overload your pizza for it to taste good. 

Pizza quattro formaggi


Pizza is one of my favourite comfort foods. A real pizza cannot be considered junk food. In fact a traditional pizza can be a part of a healthy diet. A real pizza has not much to do with the over-loaded pies dripping with greasy cheese served at most pizza parlours. There should only be few simple ingredients on the base. The toppings should not be fighting with each other for attention.


It took me some years to find a perfect pizza recipe. My benchmark were the pizzas I devoured in Italy so I guess it's only natural that the recipe that ended my search is actually Italian. It comes from a girl called Alice who is a cook on a YouTube channel MypersonaltrainerTv. If you speak Italian you should watch some of her videos. If you don't, you can still watch them. They are really fun. 


The part that I took from ricetta di Alice is the pizza base (it comes from her recipe for pizza with olives), which has always been a challenge for me. The topping is a selection of classic Italian cheeses. I chose gorgonzola (my favourite cheese) for its sharpness, fontina for it's strenght (in other words: it smells), mozzarella to soften things a bit, and parmezan  to round it up nicely. Feel free to experiment with your own blends. 


The unusual thing about Alice's base is that part of the flour is substituted with boiled and mashed potatoes. It helps to make the dough really soft and fluffy on the inside, while nice and crispy on the outside. Plus you only knead it for about 3 minutes and it rises for 1 hour. And it cuts down on some calories, so it's a win-win. 


Ingredients:

For the base:

170g/6oz boiled potatoes
300g/10oz and 1Tbsp all purpose flour
100ml/3.5oz warm water
40ml/1.5oz milk (room temperature)
22g/about 1Tbsp fresh yeast
5g/1tsp sugar
5g/tsp fine salt
2Tbsp olive oil

For the top:

100g/3.5oz gorgonzola cheese (not too creamy, I like gorgonzola piccante)
100g/3.5oz fontina cheese
100g/3.5oz mozzarella cheese (from the block, not the one in a bag with liquid)
100g/3.5oz parmezan cheese

Start with potatoes. Put some water in a small pot and start boiling. In the meantime peel the potatoes (you want 170g peeled, not 170g with the peel on). Cut them in thick slices and put in boiling water. Cook for 10 minutes and drain. Mash them well.While the potatoes are cooling a bit prepare the rest of the ingredients.

Put yeast and sugar in warm water and mix to disolve. 

Put flour in a large bowl, make a small hole in the middle and pour in the yeast mixture, milk, and 1Tbsp olive oil. Mix it a bit with a knife. 

Add warm mashed potatoes, salt and mix with a knife at first and then with your hands. You want to work the dough quickly. It should only take you about 3 minutes, just enough time for all the ingredients to incorporate well. If you knead it too long you will have to keep adding more flour and then the dough will loose it's fluff. 

Cover a large baking sheet (the one that comes with your oven) with baking parchment. Drizzle it with the remaining Tbsp of olive oil. 

Transfer the dough to the baking sheet and push it down in the olive oil. Turn it around once so it's oiled on both sides and start pushing and stretching the dough with your hands from the center to the edges. It will take you just a couple of minutes. Don't worry if the dough doesn't come up exactly to the edges of the baking sheet.

Place the baking sheet in a warm place for 1 hour. You want the temperature to be around 30C (about 85F). The best place in my house for that turned out to be a cupboard with a water heater in my bathroom.

After half an hour you can turn on your oven and start preparing the cheese. Heat up the oven to 250C/480F.

Cut fontina and mozzarella into small cubes. Cut gorgonzola into cubes as well. Grate parmezan.

Once the hour is up put just the dough in the oven for 7 minutes.

Take it out and sprinkle the surface evenly with the cheese cubes (I spread each cheese separately) and finish with parmesan.

Put in the oven for 7 more minutes and it's done! Now enjoy! 

This is a really filling pizza. It can easily serve 4 adults, especially if you serve it as a second course. I would recommend ratatouille or fresh tomato soup for the first course (both recipes can be found on my blog). 

If you want to make two pizzas just double the ingredients and divide the ready dough in half.

Fontina might be hard to come by (as I have already experienced it myself) so you may have to substitute it with another cheese. I've used raclette instead of fontina and it worked well enough. In general you want to look for a semi-hard cheese (kind of like Gouda) but with a strong smell (or stink so to speak). 

9/13/2013

Honey and mustard cucumber pickles


It's the end of summer and high time to start making some preserves (if you haven't started yet). Here in Poland we have mastered the art of pickling. We can pickle anything. I love pickled cucumbers. I don't know what it is about winter but it brings out craving for pickles in me. There are periods when I can eat a whole jar in one day. Before I started making my own pickles I would be a bit embarassed buying a jar of pickles every day on my way back from work. Pickles are a traditional companion for vodka in Poland. I imagined people would start thinking I had a drinking problem. So I would go to a different store every day to get them. That way I bought pickles only once every 3-4 days from the same store. I don't know if it's the cold, the lack of light or something else, but that only happens to me in winter.


The recipe for honey and mustard cucumber pickles was given to me by a friend of mine. It is by far the best recipe for pickled cucumbers I have tried. I always make plenty as they are always welcomed as small gifts for friends and family.


Ingredients:

3kg/about 7lb small green cucumbers
1250ml/5 cups water
250ml/1 cup vinegar (10%)
470ml/1 1/2 cup sugar
2Tbsp salt
5Tbsp mustard
2Tbsp honey
a packet of bay leaf
a packet of black pepper corns
a packet of all spice (in corns not ground)

Wash cucumbers and cut them lengthwise in quarters. Put them tightly in clean jars. In each jar put: 1 bay leaf, 2-3 pepper corns, 2-3 all spice corns.

Combine water, vinegar, sugar, and salt in a pot and bring to a boil (stir a bit to help the sugar disolve). Keep boiling for 5 minuts, then add mustard and honey and mix well.

Fill the jars with cucumbers with hot marinade (leave about a 1cm space from the top), put on the lid, and close.

Put jars in hot water bath and process for 10 minutes. Take out and let cool. Best store in a cool dark place. They should last at least a year.


The proportions of spices put in jars given here are for small jars (jam jars). If you want to  use larger jars just add more spices. 

You decide what kind of mustard you use. Just remember, the hotter the mustard the hotter the end result.

When you process the jars in hot water bath make sure you put a tea towel (or some other cloth) at the bottom of the pot. The jars cannot be touching the pot directly and neither should they be touching each other. If they do they will break and it's a pain to clean it up. Water should reach about half way up the jar. I bring the water to boil, put the heat on low, put the jars in (helping myself with a wooden spoon to smooth out the tea towel), bring the heat up a bit and let simmer.

If you use larger jars the processing time needs to be increased as well. 

Ratatouille - vegetable stew


Eggplant is probably one of the more interesting vegetables. Long before I knew what to do with it I had been fascinated with its fantastic shape and the amazing deep, almost black purple colour. For some reason I think of it as a baroque fruit. The opulent, almost sensual form miniaturised could easily become a dark pearl and would easily be the star of an aristocrat's necklece.


It comes under many names. Aubergine is most common in UK and comes from French. In Italian it's called melanzana, in Polish bakłażan. It used to be called a love-pear, supposedly because of its shape (although the anatomy association doesn't really add up). It came to Europe from India with the Arabs in the Middle Ages. In many European countries it used to be considered poisonous, but has always been regarded highly decorative.


If you are not a fan of the eggplant on its own, ratatouille is a great way of using it up. Ratatouille is simply a vegetable stew. It comes from Provence and there are various ways of preparing it, with different proportions and different techniques. Some recipes recommend preparing all the respective vegetables separately and then combining them in layers and stewing or baking. Some discard the liquid and use a selection of spices, basil included. It makes for a great starter or a main course. It's perfect for vegetarians or even vegans since it doesn't contain any animal products. You can serve it with rice, pasta, but I think it's best with just a piece of bread.


Ingredients:

1 Tbsp olive oil
1 large onion
2-3 garlic cloves
2 medium eggplants
2 medium zucchinis
2 medium (or 3 small) red or yellow (or both) bell peppers
4 medium tomatoes
1 tsp Provencal herb mix
salt and pepper

Start with the eggplant. Preheat the broiler in the oven. Slice the eggplant into 1cm rounds (less than 1/2 inch). Place them on a baking sheet lined with baking parchment and broil until they brown a little, then turn to the other side and brown a bit again. It should take just a couple of minutes. Leave to cool down. If you want to you can brush them first with olive oil, but it works fine without it and it's less calories this way.

Cut the onion in half and slice thinly. 

Heat up olive oil in a large pot, add the onion and saute over medium-low heat for about 10 minutes, stirring every once in a while.

While the onion is sauteing remove seeds from the peppers and cut them into fairly large, bite-size pieces. Cut the zucchini into thick slices and chop garlic cloves. 

Add peppers, zucchini and garlic to the onion and keep cooking for about 10 more minutes stirring occasionally.

In the meantime cut the eggplant slices into cubes. Cut tomatoes in half and remove seeds, then cut them into small cubes.

Add the eggplant, tomatoes, Provencal herb mix, salt and pepper to the pot. Cover and simmer for about 20 minutes over low heat stirring occasionally. Uncover and continue cooking for 25 minutes more

Serve warm. It should serve 6, but it's also great reheated.


I try to reduce calories where I can so I don't use much oil. If you wish you can add more oil to the pot before sauteing onion. You can also brush the eggplant with olive oil before broiling, but be careful not to use too much since eggplant will absorb almost any amount of oil.

If you are going to use large eggplants they might be a bit bitter. To take the bitterness out of it you need to salt each slice of the aubergine and leave for a couple of minutes, then rinse and pat dry.

If you have issues with tomato peel and you have the time you might want to remove it. To do so, drop tomatoes in boiling water (it helps if you cut a cross on top) and leave for a minute. The peel should come off easily. I usually don't just because it takes extra time. If you peel them, this should be the first thing you do.

If you don't have much time or fresh tomatoes aren't exactly in season (hence the flavour isn't the best) you can use chopped tomatoes out of a can.

And in case you wanted to know, it only has about 30 kcal/100g the way I prepare it, so it's really light. It's great as an evening meal.

9/10/2013

Double-nut chocolate


Double-nut chocolate isn't really much of a recipe. It's more of an improvement on store-bought chocolate. I really like chocolate bars with nuts but the ratio of nuts to chocolate is often dissapointing. So one day I decided to take matters into my own hands and make my own chocolate with nuts. 


I usually make it when I have a surplus of chocolate or nuts. I know it sounds impossible to have too much chocolate, but I do buy and stock a lot of it in my cupboards. So when I feel like having some good almond chocolate I just make it myself. The preparation is really simple and can take as little as 10 minutes. 


Ingredients:

200g/7oz plain chocolate broken into pieces
400g/about 14oz nuts

It helps if you have nuts that are already blanched (have their skins removed). It's easy to blanch them, especially almonds, at home. Just put them in a bowl, cover with boiling water, leave for 2-3 minutes, and then drain. Leave for a couple of minutes to cool and then press each almond on one end and they should easily slip out of the skin. 

Melt chocolate in water bath. To do this take a small pot and fill it with about 1cm/less than half an inch of water. Put it on the stove and start heating up. Set a metal or a glass bowl over the pot so that it will be heated by steam. Put chocolate in the bowl. Give it a stir every once in a while.

At the same time you can toast the nuts. Place them on a dry frying pan and put on the stove. Keep stirring until they start getting brown spots on them. Transfer nuts to the now melted chocolate and mix well until all the nuts are coated.

Transfer to a small baking tray lined with baking parchment. Press down to achieve single layer of nuts. Put the tray in the fridge to cool and harden.

Once the chocolate is hard break it into pieces. Store it in the fridge since it melts quickly.


I prefer using almonds but you can really use any nuts you want and have on hand. You can also mix a variety of nuts or even add dried fruit of your choice.
I use a 2:1 ratio (2 servings of nuts to 1 of chocolote) but you can change it if you feel you want more chocolate (e. g. 150g nuts and 100g chocolate). You don't have to stick to the amount of ingredients given here, they are more of a suggestion. Just keep the right proportions.

9/08/2013

Given fruit on puff pastry


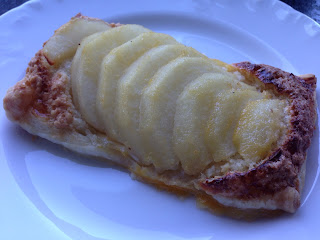
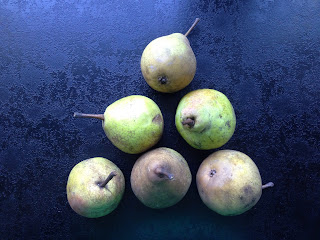
Given fruit on puff pastry. You may wonder about the name, but the explanation is quite simple. I was given some pears and not being a big fan of pears on their own I came up with this dessert. They were a gift hence the name given fruit. There can be another meaning behind it since you can use any given fruit for this dessert.


The idea for the recipe was quite impromptu. I usually have a few packets of frozen puff pastry in the freezer and as I was looking through the cupboards I found some other ingredients I thought might be suitable. The end result turned out to be pleasing enough that I decided to share the recipe here.


Ingredients:
225g/ 1/2lb puff pastry
120g/ 3/4 cup almonds, blanched
50g/ 1/4 cup powdered sugar
2Tbsp powdered sugar
some regular sugar for sprinkling
30g/ 1 1/2tbsp butter
2 eggs, separated
4-5 pears

If you use frozen puff pastry take it out about an hour before so it has the time to defrost. You can also leave it in the fridge over night. Once defrosted lay it flat and cut in rectangles (I was able to cut 10 out of my packet).

Blanching almonds is really easy, so if you only have almonds with skin on, put them in a bowl, cover with boiling water and leave for 1-2 minutes. Drain the water and peel them by just squeezing them out of their skins. They should come out really easily. Dry them with a paper towel.

Next toast the almonds. Heat up a dry frying pan and place your blanched almonds on. Keep moving them around until they get light brown spots on them. Transfer them to a food processor

Add 50g/ 1/4 cup powdered sugar to the almonds and process until pretty fine. Add butter and process for a couple of seconds to combine together.

Beat the egg whites until soft peaks start forming. Add 2 Tbsp powdered sugar and beat until firm and glossy peaks start forming. Add the almonds and fold them in with a rubber spatula.

Peal pears, cut in half and using a metal spoon cut the cores out. 

Brush each rectangle of puff pastry with some egg yolk and roll the sides a bit to create a border around the pastry. Spread the almond and egg white mixture on the puff pastry. 

Slice the pear halves and transfer each half using a knife onto the pastry and then push down a bit so the slices can spread out a bit. Brush with egg yolk and sprinkle with sugar.

Bake according to directions on the puff pastry packet (200C/400F in my case) for 20-25 minutes. 


If your pastry comes in a larger packet you might be able to cut more rectangles out of it. Then you will have to adjust the amount of fruit used.
You can skip butter. The almond mixture will probably resemble meringue without butter. 
You can spice the recipe a bit by sprinkling pears with sugar mixed with some powdered ginger or cinammon.


9/05/2013

French chocolate cake


Chocolate and cake, have lovelier words ever been uttered? There isn't really much more to say than this. It's amazing how two words can carry so much meaning. They are filled with memories of home, friends, family, celebration, pleasure. 


Every time my grandmother would want to finish an argument in her favour she would say, 'We can talk more about it when you will have eaten as much bread as I have'. And that was it. I could say, ' We can talk more about it when you will have eaten as much chocolate cake as I have'. I love chocolate. 


Without shame I can say I'm a chocoholic. I've had a very, very long and satisfying relationship with chocolate. I have also eaten a lot of chocolate cake, and I must say that French chocolate cakes are really my favourite, with American cakes coming in second. This cake is rich, dense and moist, very sensual. It's made with actual chocolate (quite a bit of it to be honest) and not just cocoa powder. There are few ingredients, little preparation, but the result is more than satisfying. Without further delay, I give you Gateau au Chocolat.


Ingredients:

220g/ 3/4 cup plus 1-2Tbsp caster sugar (super fine, or use powdered sugar for smoother texture)
280g/10oz dark chocolate (60-70%) broken into pieces
150g/ 3/4 cup butter plus some for greasing the pan
2tsp vanilla extract
5 eggs, separated
45g/ 1/4 cup flour
some powdered sugar for dusting

Grease a 24cm (9 1/2in) springform pan and coat with 1-2Tbsp sugar. Tap the excess out.

Preheat the oven to 160C / 325F. 

Put butter cut into pieces in a heavy pot, add the chocolate and most of the sugar (leave 3 tbsp for later). Set over low heat and let it melt stirring occasionally. Stir in the vanilla extract and leave for about 10 minutes to cool down.

While chocolate, butter and sugar are cooling, separate the eggs. Put egg yolks in a small bowl and in a large bowl beat the egg whites with a pinch of salt. When they start forming soft peaks add the remaining sugar and beat until glossy and pretty stiff (it all should take you about 10 minutes). 

Set the egg whites aside. Using the same electric beater fold the egg yolks into the chocolate mixture, flour, and then about 1/3 of the egg whites. Using a rubber spatula or a wooden spoon fold in the rest of the egg whites.

Transfer the mixture to the pan and bake for 35 minutes.

Transfer the cake pan onto a wire rack and let cool for about 20 minutes. Take the side off and let cool for another 15-20 minutes. Put a plate on top of the cake to turn it upside down, take the bottom of the pan off and place the cake on a serving plate. Dust with powdered  sugar.


This recipe will serve 1-10 (depending on how much you love it).

Fresh tomato soup


Tomatoes used to be a summer staple in Poland. Every picnic by the lake, every outing to a river would be accompanied by hard-boiled eggs, buttered sandwiches and tomatoes. Sitting in the sun you could eat them like apples. 


When I think of tomatoes I think of the evenings spent in my grandmother's home. She lived in a small apartment right in the city, but her home in many ways resembled a country house. Her kitchen window looked over a small balcony, a place to relax and play and a tiny garden at the same time. My grandmother liked to experiment with growing her own 'crops', which would be a single pepper or tomato plant. Once there even was a grape vine. Every year she grew night-scented stock (Matthiola bicornis, maciejka in Polish) on her balcony. It's a very humble looking plant, that opens its flowers at night time and fills the air with its fragrance. I remember sitting on the balcony or by the table in the living room, being able to smell maciejka, with the lights dim and my hair still damp from the bath, and eating deliscious tomato sandwiches my grandmother prepared. The sandwiches were very simple if not humble, just some bread with butter, topped with tomato slices, some chopped onion and  seasoned with salt and pepper. And yet they were some of the best things I have ever tasted. Those times are long gone. But every time I smell maciejka I think of my grandmother's tomato sandwiches.


Fresh tomato soup is my summer staple. Its ingredients are very basic: tomatoes, a carrot, an onion and some fresh herbs, but they capture perfectly the aromas of August, of fields filled with flowers and herbs, of thyme and marjoram gathered in small bouquets and hung to dry for winter. What's even better, this soup can be easily preserved in jars or glass bottles. Every summer I make preserves to serve a small army over the following cold months and the fresh tomato soup occupies a significant part of my food storage. It's perfect for a quick meal in the middle of the week, when you don't have the time to cook, or you just want something warm and comforting. All you have to do is open a bottle and heat up its content, serve with a grilled cheese sandwich, and you have a ready meal in 15 minutes from start to finish. Because it's really thick I sometimes use it in casseroles or even as sauce for pasta. You can add cream to it, or thin it down with some milk, it's your choice. I like it plain and simple.


Ingredients:


1 medium onion
1 medium carrot
about a Tbsp of olive oil
1kg/ 2 1/4 lb tomatoes
2 garlic cloves
5-6 sprigs of thyme
5-6 sprigs of marjoram
1 bay leaf
salt and pepper

Chop the onion and carrot (I use a food processor). Meanwhile heat the olive oil in a fairly large pot. Add the onions with carrot and cook over medium heat for about 5 minutes. Give it a stir every once in a while.

While the onions are cooking prepare tomatoes and garlic. I cut garlic clove just in half since I blend the soup with a blender. Cut the hard core out of the tomatoes and cut them in quarters. It will really take just a couple of minutes, just enough time for the onions to cook.

Transfer tomatoes and garlic to the pot and add the herbs. Stir, reduce the heat to low, cover and simmer for 30 minutes. You might want to give it a stir once or twice during that time. You don't add any liquid, the tomatoes will produce plenty of it.

If you are using fresh herbs fish out the twigs and bay leaf, and process the soup with a hand held blender. If you have the time and patience you can pass the soup through a sieve, but I never bother. I quite like having a bit of texture in the soup.

Next, season with salt and pepper, add some cream if you wish so, et voila! Fresh tomato soup is served!

This recipe will serve 4-6. If you don't have fresh herbs you can substitute them with dried herbs (1/4 tsp of each).


If you want to preserve it for winter you will need glass jars or bottles with a metal twist lid. I like to use small 250ml bottles, which are a perfect serving for 1 person. Wash them and pour in and out boiling water. Pour hot soup to the bottles or jars and screw on the lid. Place them in a pot with boiling water. Make sure to put a tea towel on the bottom of the pot so the glass doesn't touch it. The jars or bottles can't be touching each other and the water should come half their height up. Reduce the heat and let boil for about 20-30 minutes (the bigger the jars/bottles the more time). Take them out and leave to cool. Store in a cool and dark place. They should keep for about a year.